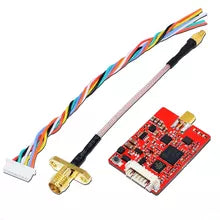
EWRF e708TM3 Pro VTX Wireless AV Transmitter 5.8G 25/200/500/800mW OFF PitM mode Switchable OSD Adjustable FPV Transmitter 7-26V
Subcribe to back in stock notification
All Prices Incuding GST
Order Through WhatsApp
+91-8249931161
Fast Delivery
Same Day Dispatch.
Bulk Purchase
Specifications
-
Model: EWRF e708TM3 Pro
-
Frequency: Bundle 1:48CH
-
Transmitting Power:25mW/200mW/500mW/PitMode ;
-
Power supply:DC7-26V(6S)
-
Current(12v):90mA(25mW)/130mA(200mW)/220mA(500mW)/300mA(800mW)
-
Weight: 4.4g
-
Standard size: 29.9*21.7*4.85mm
Main Features
-
Adjustable 4 modes: 25mW/200mW/500mW/800mW/OFF
-
Betaflight / Cleanflight OSD configuring parameter
-
Clean powerup and channel switching without interference to others
-
Smaller current(12V power supply :220mA/500mW ,300mA/800mW)
User Guide
1.LED indication
The red LED indicates the state of working mode or the item when setting the VTX(flashing 1 time means selecting the channels, flashing 2 times means selecting the bands, flashing 3 times means selecting the power levels).
The blue LED indicates the state of Pitmode or the value of item when setting the VTX( e.g. when selecting the channels, 3 times of flashing means channel 3.
When selecting the bands, 3 times of flashing means band C.As for the item of power levels,3 times of flashing means at the power level of 500mW)
The green LED flashing indicates that the VTX overheat protection is working, the power level will go down.
2.Working mode indication
After powering up, the red & blue LEDs will signal the following three items of VTX in turn: channel, band and power level(the flashing times of the red and blue LEDs indicate the item and the value respectively). After that, the LEDs indicate the working modes.
Normal: The red & blue LED are on.
Pitmode: The red LED is on and blue LED is off.
3. Setting
Press and hold the button until the red LED flash 1 time which means the item of channel selecting, then press the button can select the channels(blue LED flashing times corresponds to the channel 1-8).
Press and hold the button again,the red LED will flash 2 times which means the item of band selecting, then press the button can select the band(blue LED flashing times corresponds to the band A-F).
Press and hold the button again,the red LED will flash 3 times which means the item of power level selecting, then press the button can select the power(blue LED flashing times corresponds to the power level).
Finally, press and hold the button, save and exit the setting of VTX(This step is essential for setting).
Press the button twice will toggle the ON/OFF of Pitmode.
For Betaflight/Cleanflight OSD setting of channel,band,power and Pitmode ,please referring to ‘Betaflight OSD setting of EWRF Transmitter’for details.
4.Custom power settings
Press the button and turn on the power for 10 seconds.,the transmitter will enter the advanced mode. Blue light off, increase the fourth gear power file (custom power).
The fourth and fifth setting, add the two settings of values for the custom power file.There are 100 values (the fourth file represents ten digits,the fifth file represents digits .)
These 100 values represent the percentage of 600mw to 25mw.
Note:
- 1.Make sure that there is enough space for airflow when installing the module on the drone in case the overheating protection starts to reduce the power even to shut down at the worst.
- 2.Please install the antenna before powering up for a longer use life.
- Shipping Time:- Our orders are shipped within 24 Hours.
- Delivery Time:- 2-5 Days (Anywhere in India), 7-10 Days for remote location
- Shipping Partner:- Bluedart, Amazon Shipping, Ekart Logistics, Delhivery & India Post.
- Replacement:- Damaged During Transit, Missing Parts Or Item Mismatch.
- Return:- Item mismatch or parts missing etc.
- No return/Replacement will apply if the Product has been subject to misuse, static discharge, neglect, accident, modification, or has been soldered or altered in any way.
- We accept no responsibility for improper installation of our products. Electrical polarity must be properly observed in hooking up electrical components.


